0005 Dirty work
19th October 2019
Dirty work start of front suspension
 |
| Inside floor getting painted |
With the engine gone for a rebuild, it was time to start work on the rest of the car. I had already been working on the inside, so I continued with that to get it finished, and before long the two under coats of red oxide and 2 top coats of anti-corrosion paint were on, and it looks great. I did find three small rust holes down in the lower corner of the passenger footwell - It is in the air vent where the heating / cooling circulates on a VW, and often causes
 |
| Small rust holes in side of footwell |
rust problems due to the heat / cold cycle which can end up causing moisture, which can lead to rust. But this is relatively simply fixed, and I plan to insert either fish oil or Penetrol (or another similar rust inhibitor) into any hard to get at or hollow places on the car, which will help keep any re-occcurance at bay. In many of the photos you will also notice a silvery or rust-like line along many of the seams between panels, or notice a crumbling product that looks terrible along these joins. This is in fact an original joint-sealer compound that is applied to all cars to seal the seams fully, and had just age and is crumbling away. Thus when I remove it, it leaves an unpainted line along the seam. Once all the rust spots are treated, I will use a modern seam sealer (Sikaflex 227) to re-seal all the joints before painting over the top.
 |
| Original under-seat underfelt |
I have left the rear underlay stuff in the back until I get some new material, so I can use it as a template and see how and where it is laid. Much easier than ripping the old stuff out now and then trying to remember / guess how to put it all back in again. Biggest issue with a project like this is being somewhat anal about labeling and bagging everything so you remember where it come from - And this is especially true with smaller parts. But now the engine was gone, I wanted to get on first of all with the front suspension. In my garage I only really have room to work on one part of the car at a time, so first up is the front.
 |
| Surface rust under brake reservoir |
Most of the front suspension is accessible once the fuel tank is removed from the front boot, so this had to come out. While starting
that, I also decided to wire brush some surface rust that was on the inside left fender, which turned out to be a bit worse directly underneath the brake fluid reservoir, maybe from past spillages. Only one area is really bad, and actually eatenthrough, but on the outside
 |
| Fuel tank gets painted |
this is covered with a big reinforcing plate, so after adding fish oil to the void, we will weld in a small patch. Then the fuel tank was removed - An easy operation with just four bolts and a couple of hoses. Once removed, the top side was fine, but there was some minor surface rust on the underneath, which I wire brushed off, acid treated, and then painted with the usual 4 coats of rust resistant paint. Then I moved into the front suspension.
 |
| Corroded brake master cylinder |
At this stage friend Daryl Wilson came down for a day to help, and we pulled off first the right hand
 |
| Corroded calipers |
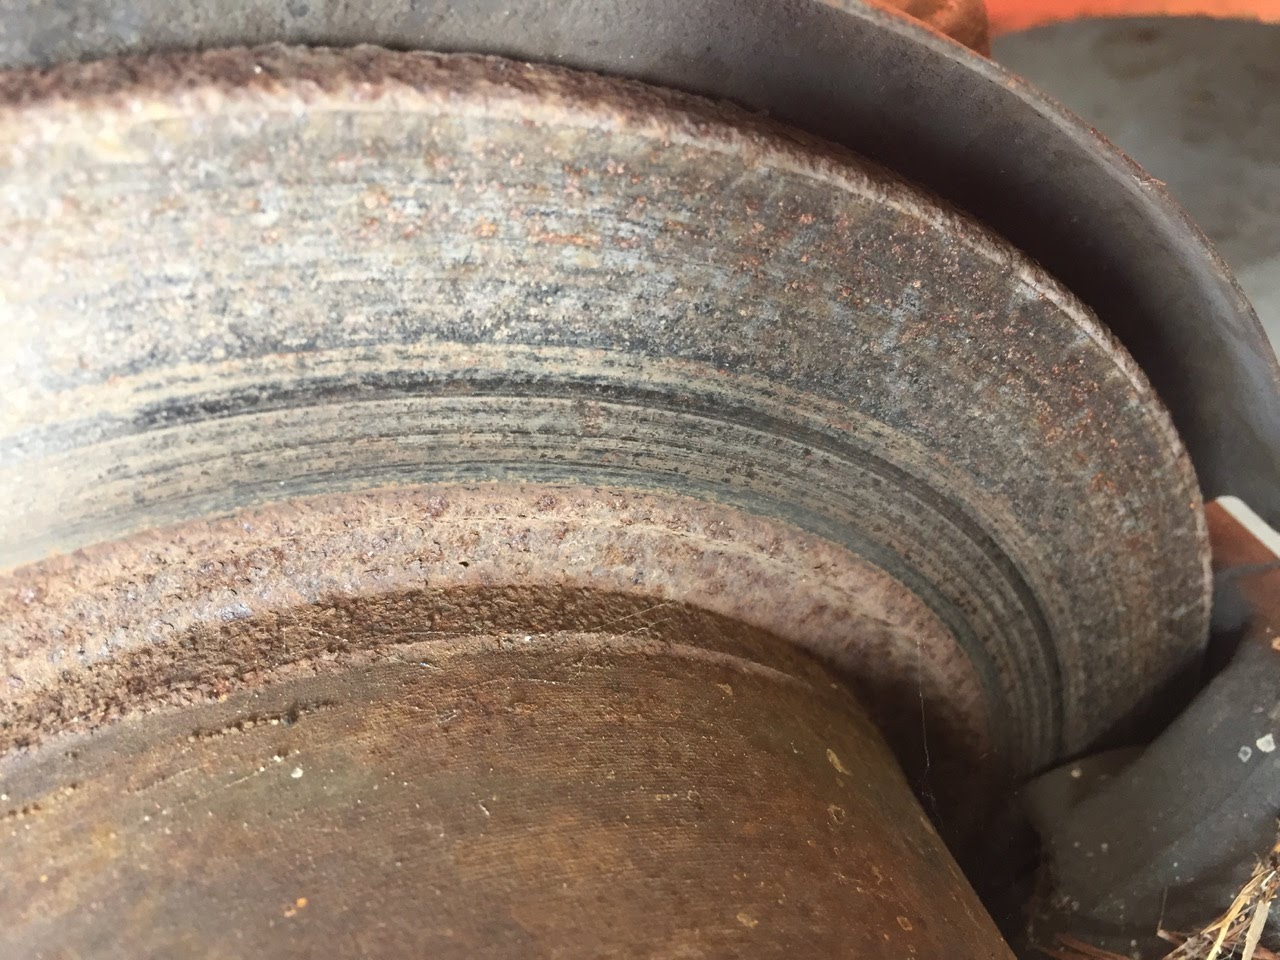
suspension, and then the left hand stuff. The right hand side was very oily and greasy, which seems to have been coming from the steering box, but is not necessarily bad because, while very dirty to work on, it was all remarkably rust free, presumably protected from the elements. We unscrewed the brake master cylinder inside, and then unbolted that - Very corroded and not too pretty
at all. The brake calipers came off looking very sad as well - not only corroded on the outside, but with lots of cobwebs on the inside, and with brake pads almost totally worn away. Along with that we removed the brake discs - Again very rusty. Not sure if they can be saved, but will run them down to Wayne
 |
| Corroded brake discs |
McKew at Better Brakes and see what magic he can perform on them. After taking off all the suspension up to the upper and lower torsion arms, on both sides, we went into the middle and removed the steering box, and with that the Pitman arm, and the two tie rods with ball joints on each end. All out, and all needing lots of TLC. Big thanks to Daryl as we achieved a lot today - much of it needing more than one set of hands, so much achieved.
 |
| Hippeastrum in garden |
Just as a diversion, we seem to have a fine crop of Hippeastrum plants this year, and they make a fine sight in the garden. Hippeastrum look exactly like Amaryllis plants, but they have hollow stems, unlike Amaryllis that have solid stems. The other major difference is that the amaryllis comes only from S Africa with only one species in the genus, whereas the Hippeastrum comes from Central and South America and there are over 90 species. And with the hollow stems of our Hippeastrums, they are much more susceptible to wind damage, and because we have been having some really strong winds come in over our canal for the past few weeks, we have had to protect them - which is
 |
| One of our Water Dragons |
why you see an old picnic table behind the plants !! And while also on a side subject, most of you who have followed my earlier blogs know that we feed lots of wild birds in our garden, not least of whch are a family of local magpies which have been visiting us almost daily for over 2 years now. But more recently we have acquired 2 or 3 Australian Water Dragons, and they often come out at feeding time for a tit bit of mince meet. This week one was obviously so hungry he ran right up to my feet, waiting for a feed. He is easily recognisable because he lost about 6 inches off his tail a few months ago, which won't ever grow back. But great fun to have in our garden, living around the fish pond.
 |
| Front suspension off car |
With the front suspension off the car, I took the brake master cylinder, calipers, and discs over to Wayne, and he recognised them as VW parts immediately, and reckoned they could be saved, resleeved where necessary, and all new seals were available. This is very important because these are all original VW parts, while many replacement parts now available come out of China etc and are not always reknowned for their quality. So we want to save an reuse as many original VW parts as we can. I then ran the steering box over to Adam at Affordable Power Steering, and he is hopefully going to wave his magic wand over that. That leaves the starter motor, the generator, the distributor and fuel pump to to refurbished, and I need to get gasket kits for the last two.
As mentioned previously, I have ordered upholstery for the seats from California, so until that arrives,
 |
| Taking out the windows |
I took the front seats apart and de-rusted and repainted the seat bases so they are ready to go to the trimmers when the time comes. Then the man from the local Instand Windscreen came - and we got all the windows out. The front and rear windscreens were relatively straight forward, and although I will put in a new front windscreen, I needed to keep the rear glass for re-use. The old rubber seals were so hard and perished (that was where most of the water has been getting in) so I already have new seals for the front and rear windows. Then we moved to the rear side windows which are a different proposition - New rubbers for them are almost impossible to find, so we had to try to get them
 |
| Rear side windows safely out |
out in good condition - Luckily they weren't as badly perished as the front and rear rubbers. But they proved very difficult to remove, and eventually we found out why - there are two smal upper and two small lower bolts hidden in the seams to help support these seals when the window is open ! We eventually found them and undid them, and after that it was faily straight forward, but for a while it had us fooled ! The windows will be the last things to go back in after the body has been repainted, and the new roof lining fitted, so it will be a while ! The glass went off to be stored under our bed !!
 |
| Both front wings off |
Now the glass is out, I cleaned up all the window surrounds and found relatively little rust except for
that one area on the front left hand A pillar which I have known about all along, and which we plan to cut out. Much of the rest is in perfect original condition. I had also removed the two front wings to make removing the suspension easier, and found some minor rust there, but again nothing too bad. The headlight wiring was interesting because all the rubber grommets were well perished, and the wiring had obviously been finished once the wing was on the car. So when I put it back together, I will need to make small mini-looms for the headlights that can just be clicked in place inside the bowl of the headlight, and this will make future removal much easier and quicker.
 |
| Damaged & dirty ball joints |
It was then onto more dirty work - using either my grinding wheel or
 |
| Cleaning the tie rods |
angle grinder with wire bush attached to try to remove grime, rust and old paint from steering rods, tie rods, backing plates, etc, so they could be acid treated and then re-painted. Very labour intensive and time consuming, and by the end of each day I was black from head to toe from all the dirt and dust flying around ! But also a very satisfying activity as you turn a rusty tie rod into a great siny black new-looking unit, ready for replacing on the car.
 |
| Refurbed brake cyl & Calipers |
 |
| Refurbed brake discs |
Suddenly the phone rang, and it was Wayne from Better Brakes telling
me everything had been saved and was ready for collection ! I was stunned that he had been able to save them all, and had even found some new brake pads for me. The parts look like new - Although the discs still need some paint on the hubs to smarten the up a little. But I am really pleased with them.
 |
| Dirty backing plates |
And then a box of parts arrived from Mick Motors in Brisbane - All my
 |
| Refurbed backing plates |
front bump stops, ball joints, tie rod ends, and shock absorbers, so as parts got cleaned up, I could start refitting them straight away. I mentioned earlier that I have not gone further into the suspension than the torsion bar arms - That is because I want to get the car back on the road as quickly as possible, and if I need to replace anything in the torsion bar set up, I can always do that later over a couple of days. And the dampers I am using are just the gas filled COFAPS units which are fine for everyday use, and a LOT cheaper than going to Bilsteins or Konis. I can always fit them later if I want to.
 |
| Dirty fuel filler hose in place |
With the right hand front wing off, I was also able to attack the
 |
| Filler hose in primer |
fuel filler hose, which was in a pretty sad state after having mud and water flung up onto it for nearly 50 years. But once again the wire brush removed all the much and crud, and it was soon undercoated. I will paint it black in the end, while the old fuel cap will be silver to set it off inside the fuel flap.
Now I am almost ready to refit everything on the front - Just waiting on some front bump stops which were not available in Brisbane, and I have coming from California, along with some carpets, a new radio aerial, and a new "VW" emblem for the front of the bonnet, because mine was missing ! Lots to do, but making some real progress. Last thing this week was that I heard from Gary my engine rebuilder, and he said that it appeared the bottom end was fairly worn, so he needs to split the case and renew all the bearings etc. That tells me the car has done a fair number of miles, but is not upsetting, as it does mean we know everything in the engine will be new and right.
Rest of the photos for this week are here :-
https://photos.app.goo.gl/em27NgowionJkFAk9


No comments:
Post a Comment