15th December 2019
Lots of things to do before Christmas !
 |
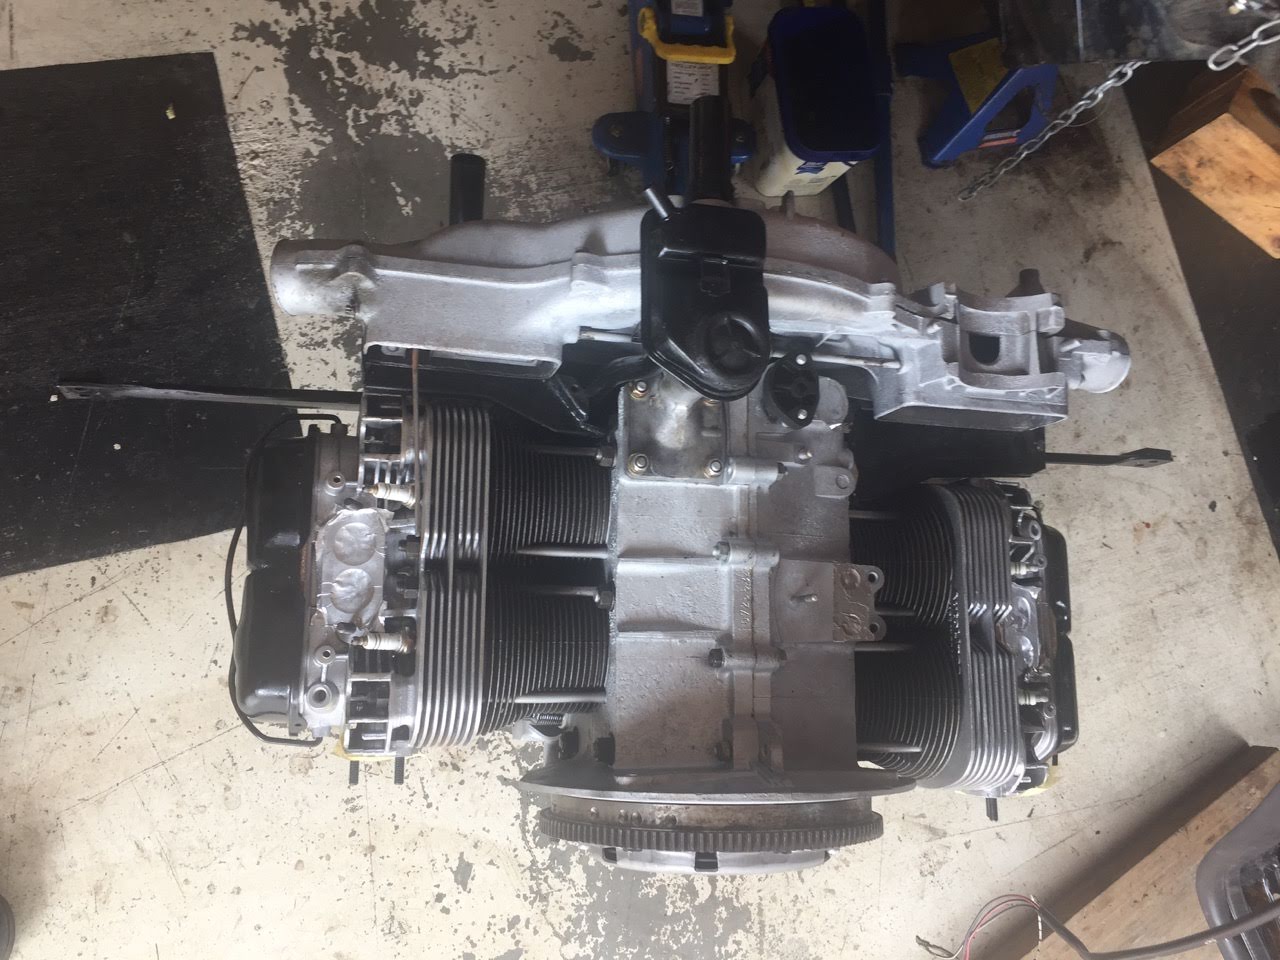
| Engine returns |
Two days after my heart attack on the 20th October, I got a call from Gary at Conti Motors up near Bribie Island - "Your engine is ready for collection" ! I knew he wanted me to pick it up as soon as possible, so as soon as I could arrange a trailer, I set off up to Gary to pick the engine up and bring it home. It was just over an hours drive to get there.
Once we had loaded the engine onto the trailer,
Gary told me all the things he had done - Basically it was a new engne. He had fitted new main bearings to the original crankshaft, new conrods, new pistons, new heads. There was also a new camshaft that should be slightly better than the standard one, and everything was cleaned up nicely. He has also tapped a thread into the block so I can fit an oil temperature guage, as being an aircooled engine, it is most important to keep an eye on engine oil temperatures as you have no radiator or water temperature to monitor.
 |
| Frozen spindle on engine |
Once I got home, Bob, my neighbour who had lent me his trailer, came over and we were able to lift the engine off the trailer quite easily - It is a lot lighter when the exhaust and all the ancillliaries are not fitted. We put it straight onto a little dolly on wheels so I can move it around the garage easily, and have done the same with the gearbox. One engine item that Gary had forgotten to do while the engine ewas apart was to free up a seized air flap spindle, and he had been most apologetic that he had forgoteen this. So my first job was to spray lots of lubricating fluid onto the spindle and leave it to soak over night. Next morning it was still stuck tight, and I was starting to fear it would be a major job to remove the flywheel and cover, but I decided to try the rear axle nut trick - some heat from a hair dryer and using eucalyptus oil to soak it. I also adapted an old plastic syringe so I could forcefully inject the oil into the spindle to try to get it to free up.
2 hours later, with constant twisting, the spindle finally moved, and 5 minutes later, after lots of rusty lubricant had come out, it was totally free, and could now easily be moved by the engine operated thermostat bellows which will expand as the engine warms up, and then open the flaps to allow cooler air into the engine. Job done.
 |
| Reinforced throttle cable outer |
On closer inspection, the outer cable for the throttle cable had been damaged at one end and was not supporting the inner cable very well. Buying a new outer was an option, but first I decided to try to brace the damaged section with a small alloy bracket which I made up, and fastened onto the outer cable with two small hose clamps. As this cable is tucked away in the very back of the engine bay, it will never be visible, and it seems to be even stronger now than the original outer cable, so I will go with this remedy for the meantime. It might even last another 50 years !
 |
| Slide on camper |
 |
| But not much room inside |
One day, I spotted a US style slide-on camper in a sale yard, so we went
over to inspect it - not seriously planning to change my Toyota over, but interested in a camper option where the bed stays made as you travel, so you don't have to "construct" the bed every night - One of the few annoyances I find in the Toyota. The cab is only a single cab, so would offer us no more space than Troopie, while the camper section was actually just not that much more spacious, and the dark brown colour scheme was really quite oppressive. Problem solved - We don't need a slide on camper !
 |
| Rear fender primed |
|
I then removed the rear left fender and after cleaning it up inside, acid treated any rust and then painted it all with 2 coats of rust seal. I then sanded back the outside of the fender itself, removing any minimal surface rust, filling a couple of minor dents, and then completely primed it with grey etch primer - She is now ready for painting.
I then moved back to the rear axle. I had read and pondered about this, and finally plucked up the courage to tackle it, and before long I had the short stub axle out, along with the bearings, abig circlip, and the two grease seals. That wasn't too hard ! Then I moved to the torsion bars, which I REALLY didn't feel confident about working on, but which I needed to do. Getting the outer cover off was easy - 4 bolts and she was off. The two bushings inside were really deformed, but as I had the replacement ones, all was good. Then it was the torsion bars. I had inspected the inner end of the trailing arm, and the rubbers didn't look too bad, but it was all pretty manky and rusty in there, and cleaning it up by hand while it was on the car was never going to work. And I have always wanted to pull a VW torsion bar apart.......!!
 |
| Torsion bar plates marked |
The splines have to go back exactly where they were, otherwise you are raising or lowering the suspension which I don't want to do at this stage. So first thing is to carefully mark where everything is, and also to measure the angles of them. Wondering how to do this, I suddenly remembered that the iPhone has an inclinometer in the compass function, and when I fiddled with it, and set it on the torsion bar arms, it indicated 20°, which is just
 |
| Angle of torsion bar plate |
about where it should be. But is the car level, seeing it is on axle stands ? So I set it on the door sill where the manual says to take the reading, and the reading was 0°, so the total angle was 20°, which is exactly where the total should be - Between 19° and 21°. Now it was time to get the torsion bar plates out, which first have to be lifted off a stop, and then pulled ourwards - Apparently ! Lift up with the jack.......and the whole car lifts off
 |
| Angle of car chassis |
the axle stands because there is no weight of the engine, gearbox, seats or interior in the car !! After some thought, I go down and buy some chain and a small turnbuckle, and after winding it around the damper mount, try lifting. It seems to work, until the turnbuckle distorts and snaps ! Back to the shops for a stronger turnbuckle ! This time it works, and once I work out how to pry the torsion bar plates outwards, it finally comes - Not easy, but I got it. You actually have to bend the ends of the plates outwards, not slide them outwards. After ginally checking the markings to enable accurate re-insertion, I pull everything off and end up with a rear torsion bar in my hand. Victory !
 |
| Removing trailing arm |
Next job was to get the trailing arm off. Once I had found a 19 mm allen key to fit the pin, it was still slow work as I could only move the breaker bar about 4 inches, so I had to make a lot of small movements - Meanwhile holding the trailing arm in place with my shoulder !! And since I am now on blood thinners, I ended up with my shoulders black and blue with bruises !! Interesting times. Anyway, the pin thread was well rusted in
 |
| Sandblasted trailing arm |
(never been taken out before?) so was tight all the way, but finally came out. The rubber bushings in there are not too bad, and one is in really tight anyway, so they are going to stay. Off to the sandblaster with the trailing arm, and a day later it was spotless, and ready for painting. I am going to need some help getting the new bearings pressed in before I refit it, so I set that aside and worked on some other jobs that needed doing before we went away for Christmas.
 |
| Old roof lining removed |
Inside the car I needed to first of all remove the rest of the original ratty roof lining. This came out fairly easily, with a number of wire bows that keep it in place. Unfortunately the new roof liner is not quite identical, so I hope that it is all going to go together OK. The inside of the roof itself had a lot of surface rust, which
 |
| Coating inside of roof |
is what had discoloured the original roof lining from the inside. While not deep rust, it needs to be treated or it will only get worse, and stain the new roof liner. So I had a fun time trying to sand it all down above my head - Eventually getting it all rubbed down and ready for painting. Once again two coats of anti-rust paint should be enough to keep everything stable. Unfortunately there is a double seam around the edge of the inside of the roof, and no paint brush is going in there ! So once the roof paint was dry, I used the spray can of Penetrol and sprayed down into the seam, and hopefully this will at least deter further rust formation. I will do a second coat before the roof liner is fitted.
 |
| Outisde of boot lid all primed |
Before I tackled the back parcel shelf, I dedcided to deal with the
 |
| Inside of boot lid in Clementine |
boot lid, and then remove it completely. I rubbed down the outside of the boot lid while it was on the car, and after that was all finished, I unbolted it and took it outside, where I used my panel beating stands (thanks D !) and worked on the inside. In the interest of keeping costs down, I don't plan to have the inside surfaces of the car sprayed when the car is painted, so after I had rust treated any bare steel, I used the Clementine spray cans I had obtained from AutoBarn to see how it would look. Result ? Really good - Perhaps it could be a bit more glossy, but I will compare with the outside later. I intend to insert sound proofing into the boot lid panels anyway, so not a lot of the paint will be visible in the end.
 |
| Rear parcel shelf rust proofed |
With the boot lid done, I could more easily access both the rear parcel shelf and the boot floor itself, and after using acetone to help remove the residual dlu from the carpets and liners, I sanded bck both surface in readiness for painting. The parcel shelf I decided to paint first with two coats of KBS Rust Seal, because although it was not badly rusted, water had leaked through the perished window rubbers and there was some residual rust there.
 |
| Boot floor in red oxide primer |
For the boot floor, after acid treating any rust areas, and resealing the seams, I just painted it all with red oxide Rust Guard primer, which ironically is very similar to the Clementine car colour ! I have used this over much of the interior, and as this area is going to be covered with noise and vibration suppressing material, as well as carpet, the colour of the floor is immaterial - As long as it keeps rust away in future !
 |
| Child's seat clip |
While in Perth with son Damien, I found a child seat clip which is what I need to fit on the back shelf if I am going to be able to fit a child seat in the back for grandchildren. Plan is to fit 3 of these across the back so that we can easily fit baby seats in there legally if we want to.
And with that all done, and Christmas looming, it was time to head of to the cool of Tasmania to our daughter Sarah's family for Christmas. So everything in the garage was tidied up, Janet's car able to go back inside the garage during our absence, and we headed off to Tasmania in our Toyota Troopie.
Rest of the photos are here :-
https://photos.app.goo.gl/G4XVzKADwZN8xLgk8


No comments:
Post a Comment