0017 Corona Virus strikes !!!
31st March 2020
Self isolation is easy when you have lots to do !
In my last post, I had prepared all Clementine's panels for painting - Primed, rubbed down with 600 wet & dry, and ready to go for painting. So this Monday I went over to check that the paint was ready - "Sorry, the tints haven't arrived yet, and not sure when they will get here". Grrrrr. So I then go over to the painters, and it turns out they are having a bit of upheaval at the moment, and it will be 6th April before they will be able to take the car for painting !! Bugger. Well, at least the paint should be here by then !! (If not, I checked with another local paint supplier, and he has the tints in stock. ) So I guess I have the time to do some or all of those jobs that I was either putting off, or not planning on doing at all ?!! Always a silver lining in every black cloud, I guess !!
 |
| New fuse boxes fitted |
I have got my new fuse boxes fitted, and it looks good, although the wiring still needs a lot of tidying up. I cannot fit the indicator and ignition wiring yet as I am waiting on some small clips to arrive from China. But that should be quite easy and then the steering will all be finished.
 |
| Inside rear as it started |
One of the jobs I was not originally planning to do was to strip all the glue off all the inside panels where the carpet had been fitted, and paint it all. I had decided that it was more important to get the car up and running because the inside metal bodywork was basically in pretty good condition. However with the extra time now available
 |
| Inside rear stripped & acidized |
I decided to strip it all out and paint it. It turns out that a wire brush attached to the drill, in conjunction with judicious use of acetone, is probably the quickest way to strip not only the old glue off the paint, but also the paint over any rusty places, and the front foot wells and panels behind the rear seat took me 3 days to
 |
| Inside rear all painted |
strip clean, treat any rust with phosphoric acid, wipe down with methylated spirits, and then give it all two coats of paint. It turned out that there were a couple of areas that were suffering quite badly from surface rust, so I am now glad I stripped them off and treated them. Otherwise they would have continued rusting and soon caused a problem.
 |
| Repaired air hose |
I then moved on to a couple of ratty looking hoses in the engine bay that obviously needed some TLC. I searched for replacement hoses, and the only ones I could find were in California, and with the terrible Aus $ exchange rate combined with the fact that the hoses are quite bulky but light, so freight is expensive, I decided to try to fix up the ones I have. I removed one, and found the hose was totally squashed, and split - No air had been passing along this tube ! They are made of a kind of coiled alumnium inner covered in a paper cover. I decided to cut the hose at that point, and found an old 35 mm film canister on my shelf that was the right size, and I inserted it into the hose both to act as a joiner of the two separate pieces, and also to support the weakened section of hose (where it had been squashed) from the inside. After some careful work, and gluing, it all come together well, and with some black electrical tape as a final support over the
 |
| Thermostat and hose unit |
join, all was good. I then de-rusted and painted the metal elbow, and while that was drying, I took off the second unit. I went a bit further this time, and took off the box unit, expecting to find just an empty junction box - And to my surprise I found a thermostat inside ! While removing this LH side unit, I found it was
 |
| Thermostat inside housing |
identical to the RH unit, with all screws on the same side. This meant that screws that were easy to remove on the RH side were almost impossible to reach on the LH side - So once the unit was off, I redrilled all the self tapper screw holes on the opposite side so they would be accessible next time they need to be removed !
 |
| Spider inside housing ! |
 |
| Spider removed from housing ! |
I wondered if these thermostats were working. I had tested a similar engine thermostat by inserting it in boiling water till it opened. It was a struggle, but I eventually removed the thermostat from the housing, and tried it in water - With no success - It stayed firmly closed. Broken ?? I went on the internet and found out that the engine thermostat which I had tested operated at 60° C, but these units are set to only open at
 |
| Using the heat gun |
140° C - So boiling water wasn't going to do much - I needed a better source of heat. Not owning such a thing, I manage to locate one at friend Jamie's house, and after removing the 2nd unit (which was in equally poor condition) and cleaning them up, I set
 |
| Hot air soon opens thermostat |
off to his house. Firing up his gas hot air gun, and using it carefully, both thermostats quickly opened, which was a big relief - These thermostats are no longer available anywhere, and repairs are almost impossible. I went home with a smile on my face, and set to to paint and refurbish both units and hoses before refitting them to the car. They are in fact warm air mixing boxes, and are activated by the exhaust gases, which explains why they open at 140°C.
 |
| Lifting engine onto engine stand |
 |
| Engine on stand |
With these items sorted out, I decided to move on to the engine, which has been sitting on the floor of the garage for the past couple of months, too heavy for me to lift. I was prepared to buy an engine stand, even though it is a rarely used item, but then I found my friend Winno had one that he was prepared to lend me. Now I just needed a way to lift the engine onto the stand ! Luckily Steve at CCC was prepared to lend me his hoist for the weekend, and brought it round to me in the back of his ute while he was on the way home. We started to fit the engine to the frame, but found that I needed several bolts and spacers to make it fit, so Steve went home, and I set off to the Nut & Bolt shop. After a couple of trips (fortunately it is close-by), I had what I needed, and once the bracket was mounted to the flywheel, I set the hoist up, hooked the engine up with some straps, and hoisted it into position. Quite simple in the end, and it means the engine is not only at a much better working height, but can also be rotated so you can easily work on the sides and the bottom.
 |
| What the engine looked like 4 months ago |
With the engine in place, I rescued all the tinware ducting that I had cleaned up and repainted back in November, and which had been stored in my study ! The aircooled VW engine depends totally upon careful and complete direction of cooling air over all the finned surfaces of the engine. Leaving even one piece of the ducting off, or even having it poorly fitting, can cause major overheating and long term engine damage - In the same way that having no water in a watercooled engine can be catastrophic. While I worked out the puzzle, I also spent several hours on the wire brush wheel, cleaning up all the many bolts, screws, washers etc that hold the ducting in place. If you look at the photo of the condition of the engine when I received the car, you can see
 |
| Engine now |
how filthy / rusty/ oil covered it was - Over the past 4 months, I would say that I have spent at least 50% of my time (if not more), cleaning, de-rusting, and painting panels, screws, and bodywork. I have tried to do the cleaning as I removed parts, but didn't always manage to keep up - And these screws and bolts for the ducting were one item where I had fallen behind.
With the screws all cleaned up, I started to fit the panels, including the inlet manifold which fits inside the ducting. When fitting the fan belt cover cowling, one of the screws stripped, so I had to get an M6 coil inset to fix the problem. I got one side done, and then had to fit the oil cooler which goes underneath the ducting. There are 2 long screws that hold the oil cooler in place, and I have searched high and low, in every box and bag of parts, but been unable to find them. I have bagged and labelled everything very carefully just to avoid such issues, but in this case I was stumped , so I went down to the nut & bolt shop and bought two more ! Very fiddly to fit, and with a new insulated heat resistant foam covering that I have made to replace the original foam which fell apart in my hands when I took then engine apart. Simultaneously I was trying to work out how some of the brackets fitted - I referred frequently to all the photographs that I have been taking all along, and they helped me to work out where everything fitted. Eventually I was able to get the generator fitted, along with the fan belt. I cleaned up the fuel pump rod which was just yucky from old fuel residue, and once I have rebuilt the fuel pump, and had the distributor checked, I will just be waiting on the carburettors that Steve is working on, and the engine will be ready for installation.
 |
| The unknown item, as found |
At one stage I found an odd item that was unlabelled - Most unlike me ! I didn't have a clue what it
was, so I cleaned it up a little, took a photo of it, and posted it on a VW forum to see if anyone recognised it. Sure enough, someone knew it was an ignition part - But wait, I had never taken my ignition to pieces ?! A mystery. Then a couple of days later I was going through my photos looking at how the engine accessories fitted together, and I suddenly spotted it - It had been lying on the floor, wedged behind the battery when I got the car, so had been left there by the previous owner ! Mystery solved - Not something I needed !
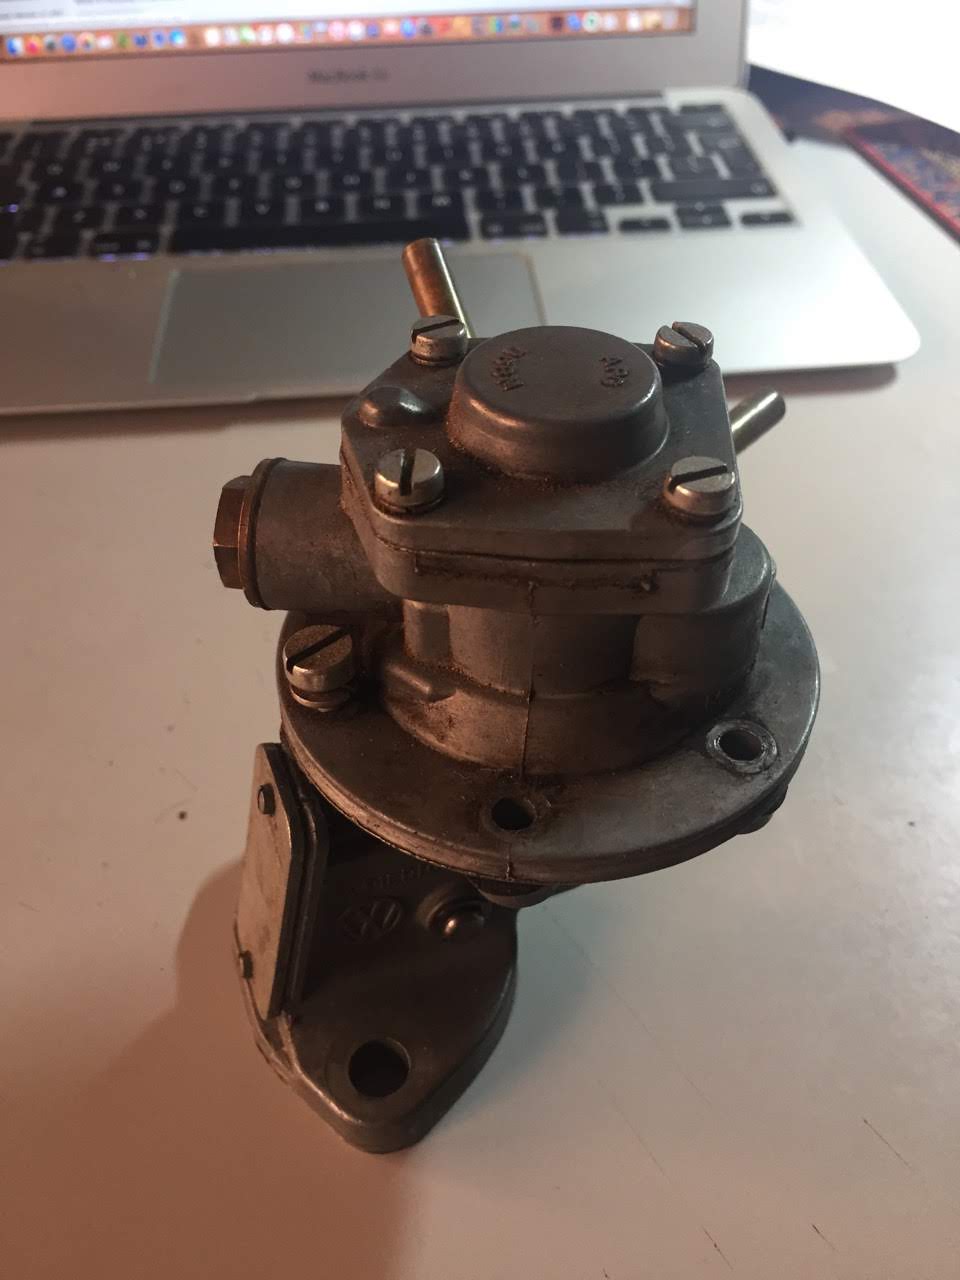
 |
| Fuel pump for repair |
The engine was coming together nicely, and one evening I decided to tackle the original fuel pump. I had
 |
| Fuel pump repairs underway |
purchased a new unit some time ago because I was told that the rebuild kits for the original were terrible. But since then I had read that there were new rebuild kits which were excellent, and made the original pumps better than the cheap "asian" sourced complete units like I had purchased. I slowly and carefully pulled it all apart, and found it was caked with dirt and crud inside while the diaphragms were both very stiff and inflexible. It all cleaned up quite easily, and then I put it all back together, using the new parts kit that I had just received from California. Before I went to bed it was all ready for mounting on the engine !
Over the next couple of days, I continued to put all the ancilliaries back on the engine. I found spare parts for the distributor on line (condenser, points, and rotor) - My Australian made car is once again an oddball - The distributor used was quite rare, so finding parts wasn't straightforward. EBay and Amazon come to the rescue - Its amazing what you can find on line. While installing the distributor I had to find the approximate timing, so I had to whip the valve covers off so I knew which piston was at TDC, and while I was in there, I decided to check the tappet clearances. I haven't done this for a LONG time - Maybe even on my old beetle back in the 60's or 70's, but once I got into it, it all came back to me. It was a good job I checked them because a couple were far too tight. So with that done, and the distributor fitted, I could move on. For the moment, in the interest of saving some $ for the moment, I am keeping the original plug leads etc - So I cleaned these all up as best I could, and trimmed the end of the leads so the plug caps screwed into fresh wire. I have fitted new Bosch plugs, so popped these in and tightened everything up. I think we are ready to go if we can just get the darn car painted !!!
 |
| Scrap of paper found in seat |
Last photo this week is of a scrap of paper I found inside the padding of one of the front seats - It seemed to have got stuck to the coconut fibre padding that is used. Googling the writing I found on the piece of paper, it turns out that F.S. Fehrer is still in business making seat upholstery, while "Rosshaarspinnerei" means "horse hair spinner", and if you look on line there are photos of the original factory ! Apparently this piece of paper is a direct link to one of the original VW suppliers !! Interesting little piece of history.
Other pics are here :-
https://photos.app.goo.gl/TGk3ync2k9FHBzUW7


Dear Giles,
ReplyDeletewhen we first met in North America, in Glacier and later in Banff National Park and further north, in July 2016 I had no idea what an unbelievable car specialist and enthusiast you are. Only when we visited you at the Goldcoast in April 2018 that became clear to me. You were preparing the 1954 Austin Healy at that time for the Beijing Paris Challenge 2019. During that race I followed your route almost every day and was most impressed when I saw that you really made it to Paris. And now already the next car project is on the way. And again the target is to reach Alaska with it, at the end of the Panamericana. I have no doubt that you will succeed.
All the best for you and your family.
Best regards from Germany
Franz Thoren