0022 The engine gets fitted
26th June 2020
It is still a long way to the end !
 |
| Lifting the engine off the stand |
This was the week that the engine was to be fitted, so over the
 |
| And in the trailer |
weekend I borrowed a trailer from my neighbour and used it to pick up the big engine hoist from CCC. Over the weekend I manipulated the engine off Winno's engine stand (where it has been for a couple of months) and into the trailer. I then loaded the gearbox, and fitted the folded up engine hoist in the trailer as well, and tied them all down firmly. I also ensured I had all the nuts and bolts and hoses and clutch and everything else I would need down at Classic Car Clinic as we put the engine in, and did the several other things we needed to do in order to get Clementine running.
 |
| Sitting in the sunshine |
 |
| Loading on the truck |
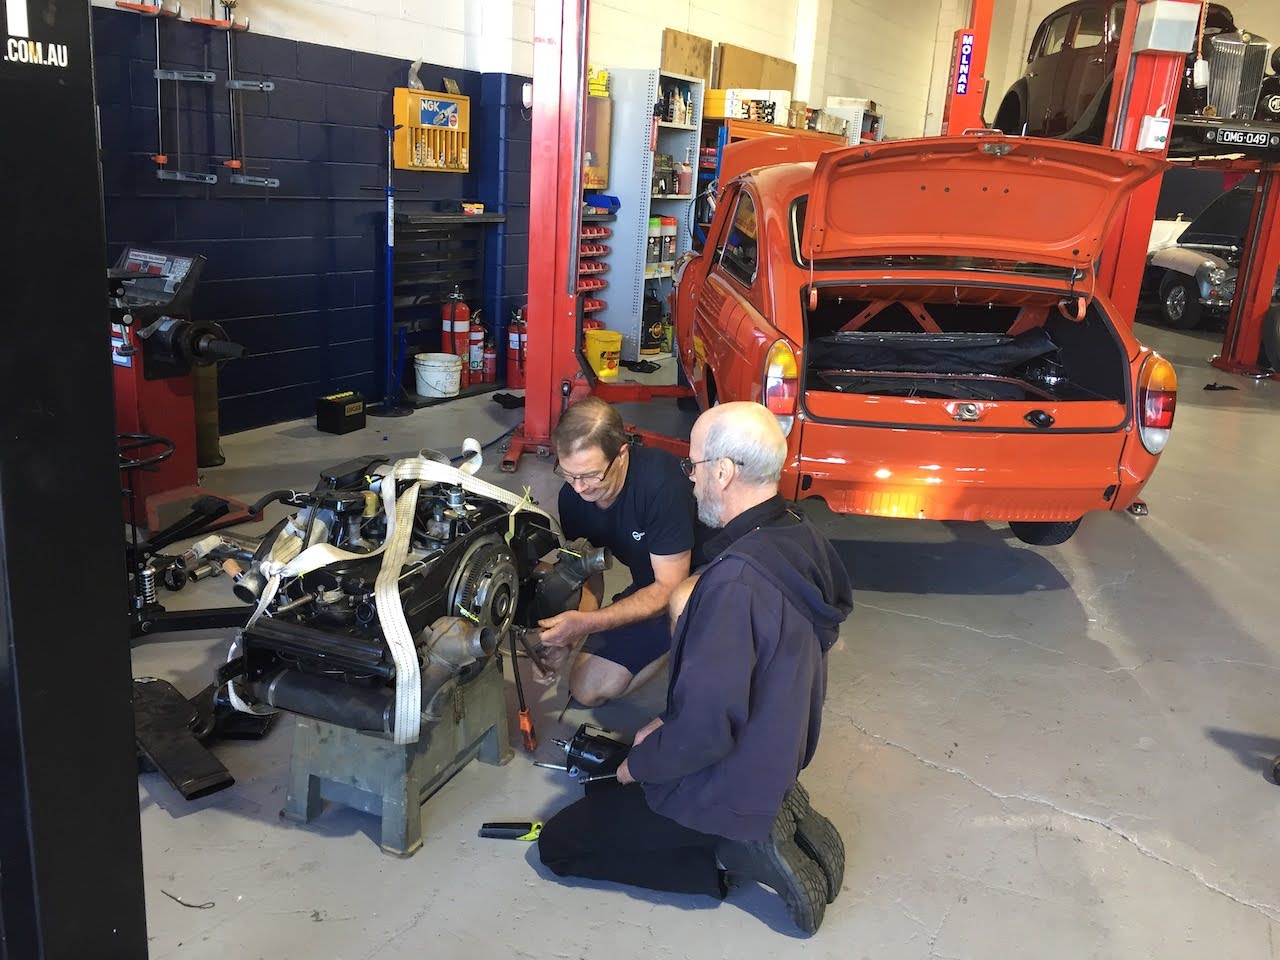
Monday morning dawned bright and sunny, and I got Clementine out in the sunshine, ready for the flat bed truck that ws going to take her to CCC. Once safely loaded, I followed behind with theengine in the trailer, and on arrrival we unloaded everything. Within 5 minutes, Steve and Rob had the clutch fitted, and we went to install the engine - You cannot believe how good it felt to have someone else help me to put Clementine together !! The engine went in without too much of a struggle, the gearbox was hooked up, Looking great !
 |
| Fitting the clutch |
 |
| And engine back in the car ! |
Steve then used a strong soldering gun to install a 30 amp fuse in
the main power line from the battery. This wire goes all the way through the car, via the regulator and several other switches, without ever being fused, and if something ever shorted out, it would destroy several items. It was set like that by VW, but is a fairly common alteration. We then filled the gearbox with 75W-85 gear oil, and added DOT 3 brake fluid to the reservoir in preparation for bleeding the brakes.
 |
| Installing the exhaust |
 |
| In line fuse fitted |
I then started fitting the stainless exhaust from Vintage Speed, not
only to make sure it fitted, but also to check for space to fit the adaptor plates for the heater pipes. This new exhaust does not enable the original pipes to be fitted, so I have to have some adaptor pipes made up. I also fitted the drive shafts and UJ's that Steve had made up for me - All new UJ's. After a brief delay incurred
 |
| Drive shafts fitted |
when we mislaid some of the bolts, they were soon in place. I noticed one of the shafts had a little surface rust, so over a couple of days I rubbed it back and painted it with ant rust paint so it looked as good as the other one.
Last week I was visiting a friend with another Type 3 VW, and noticed that under the brake master cylinder he had a metal stone shield which I do not have. On further enquiry I learned that all type 3's had this item - Sensible really since the brake cylinder
 |
| Brake shield on other car |
cylinder is very open to damage from stones thrown up by the wheels. The next day I looked under my car and sure enough there were two M6 bolt holes there ! I found a couple of bolts, and after cleaning out the
 |
| Rusty brake shield in NSW |
threads, they screwed in easily ! I wonder where Clementine's original shield went ? Another mystery. But now I had to find (or make) a replacement. Via the internet, I was soon contacted by another Type 3 owner in NSW who had a couple of old chassis', one of which had a shield still fitted. He has promised to see if he can remove it this weekend, and if so, will sell it to me ! Watch this space !
 |
| Window fitted to door at last |
Meanwhile I was negotiating with Barry at Split Decision to fit the wind up windows in the doors, but he is so busy with his other work that he couldn't fit my work in. Finally he had some time, and by the end of the week he had finished one door. I was comforted when he told me that it was one of the hardest jobs he had done for a while - No wonder I had had so much trouble. I took the door home and over the next few days I fitted the rubber door seals, then a new plastic inner moisture liner, and finally the door card. One door ready for fitting to the car !
Meantime Steve and I continued to try to bleed the brakes on the car. We pumped and pumped the brake pedal, to no avail. We thought it was just air in the line, so we tried to blow through the lines, and we tried to suck through the lines, all to no avail. Steve was busy with other work at CCC, so we only worked on the car sporadically, so it was a couple of days later before we found the problem. When Better Brakes had re-sleeved the rear wheel cylinders that had forgotten to drill the small hole though the sleeve that allows the bleeders to act as bleeders, so the lines were effectively blocked. So we have had to take the brakes apart and remove the wheel cylinders, and take them back to be fixed. At least we have found the problem, but it means we can't do anything further until after the weekend ! And because I haven't got my second door back from Barry yet, I guess I will have to do some work around the house this weekend ! Frustrating !
 |
| Fitting the door rubber seals |
After the weekend (spent painting a new wooden door at the house !) Barry called me to pick up the 2nd door - He had worked over the weekend to finish it. Big thumbs up for Barry at Split Decision. Once home, I started fitting the rubber seals, and once that was done I started work on the inner door card and trim. I
 |
| Door card all fitted |
had redone all the cards several weeks ago, but first I had to refit a plastic liner to seal the back of the card from any moisture - I fitted this using a silicone bead. Once dry, I fitted all the plastic cups to the holes in the door and then the corresponding clips to the door card, and once they were all lined up, I clipped it all home. Perfect ! With the door pull / arm rest clipped behind the metal tab in the door, and the window winder installed, it was all done !
 |
| Brake shield as found |
Also on Monday, the brake master cylinder shield turned up from in NSW in the post, and I quickly wire crushed away the rust and the mud,
treating it with phosphoric acid, and then giving it a couple of coats of Kill Rust paint over the next couple of days. Ready to install !!
 |
| Brake shield as received |
Meanwhile, on the car down at the CCC workshop, we actually connected up the battery to see what we had in the way of electrics !! First off - No smoke from
 |
| Brake shield acidized |
anywhere - Thats a good start !! Sidelights ? Back yes, front no. Headlights ? Yes ! But didn't seem to undip. Left indicator - Yes ! Right indicator - Whoops, blew a fuse !! Tried a couple more times, but more fuses went - It finally seemed to be a problem in the steering column indicator unit, so we schedulaed a deeper investigation. In the meantime we found that the clip that held
 |
| Brake shield painted |
the right hand side light in place was broken, which explained the lack of front side lights. Need to order a new one. Then I investigated the LH unit, and found a similar issue - But the local VW place only had one !! So I fixed the second one with a soldering iron and will replace it once stock is available. Steve also showed my that although several of the older bulbs were not blown, and showed continuity on the multimeter, they were in fact not working due to age. Once these were replaced with new ones, and the new / repaired clips were fitted, we had side lights !
 |
| Bodywork all complete |
Deeper investigation behind the fuse box into the fusing issue made us think that both the headlight relay and the flasher unit might be faulty, and until we can install some new units and test this theory, we cannot be sure. So I ordered new parts immediately, and although one part arrived from Brisbane the next day, the other part from NSW has taken a little longer, and unfortunately is still
 |
| Clementine arrives home |
not here 5 days later. In the meantime, not a lot we can do. So I have taken the doors in and we have fitted them, and while we wait on the electrical items, we are also waiting on our last mechanical item - The carbs. Andrew has now completed the lever arms, and Steve is working to try to get the rest of the carbs sorted and back together. Not just a case of bolting them together - A lot of fitting and fettling. Time to take the car home.
We WILL get there !!
Rest of the pics are here.
https://photos.app.goo.gl/Pb6uHnrR6eEh1rqD6


No comments:
Post a Comment